Tracklaying on the fiddle yards is now complete following delivery of five hand built right hand points from 3mmSMR.
There now follows a break while I continue redecorating the house. When I return (probably when temperatures fall in the autumn - or when I get bored again with the redecorating!) tracklaying will recommence on the three scenic boards.
I was at an exhibition at the weekend at Woolwich Firepower and the stand next to me was selling a home made version of the Noch flocking system which allows you to create realistic upright grass. He was doing a demonstration with his version which is a combination of an electric fly swatter and a metal tea strainer. Noch - £130. Bexley Models - £17.50.
Needless to say, the grass when applied to Alexandra Junction will be pointing upwards! As this wont probably occur for a year or two, you will just have to wait to see the results as the layout is scheduled for completion in time for the 3mm Society 50th anniversary year which is in 2015.
Welcome to my blogspot which aims to show progress on my new 12mm gauge 3mm scale layout Alexandra Junction and to show what can be achieved in 3mm Scale. The layout is designed to showcase my extensive collection of 1970s and 1980s trains.
Monday, 4 June 2012
Sunday, 29 April 2012
Work will now stop for several weeks to await delivery of some hand built points from my friends in 3mmSMR which are the result of some horse trading for some single and double slips, and three way points which in the end I could not use. These will allow me to finish the outer fiddle yard.
Work will then turn to the scenic section of the layout. I bought some of the new (ish) backscenes from Gaugemaster at a show the other week and one of these was a lovely (!) industrial scene which I am told is Middlesborough. I have also asked my friend Howard Love in France if he can build me some terraced housebacks, the sort you still find backing onto the railway in industrial towns.
I also promised a better photo of the master for the class 66 and here it is!
Monday, 23 April 2012
Another couple of weeks have passed and although temperatures remain mild, the rain has hampered my enthusiasm to progress in the garage, but I have been doing some work indoors on locos.
Since the last post, I have laid track on the curved board and rearranged the boards to allow construction to commence on the "missing link" the interlaced interface between the two fiddle yards. I think that there will be the 3mm equivalent of the "Golden Spike Ceremony" when this one is finished!!

This will be the most challenging board on the whole layout with (I think) 16 points to juggle into a 4' x 2' space. I have already made a couple of design changes in order to make the track layout fit the space better - the last point on each fiddle yard now sits on the adjacent board, and the fiddle yard roads will fan out in pairs rather than one after the other. Phil Smith, who is beavering on a track plan for this site will probably kill me after reading this!
The box at the end of the boards contains points salvaged from my previous layout and hopefully when refurbished, these will form the mainstay of the two throats. I am still undecided whether to make the blades hanging free, or sprung loaded to save on point motors and wiring or bite the bullet and motorise all these trailing points! Watch this space!

Since the last post, I have laid track on the curved board and rearranged the boards to allow construction to commence on the "missing link" the interlaced interface between the two fiddle yards. I think that there will be the 3mm equivalent of the "Golden Spike Ceremony" when this one is finished!!
This will be the most challenging board on the whole layout with (I think) 16 points to juggle into a 4' x 2' space. I have already made a couple of design changes in order to make the track layout fit the space better - the last point on each fiddle yard now sits on the adjacent board, and the fiddle yard roads will fan out in pairs rather than one after the other. Phil Smith, who is beavering on a track plan for this site will probably kill me after reading this!
The box at the end of the boards contains points salvaged from my previous layout and hopefully when refurbished, these will form the mainstay of the two throats. I am still undecided whether to make the blades hanging free, or sprung loaded to save on point motors and wiring or bite the bullet and motorise all these trailing points! Watch this space!
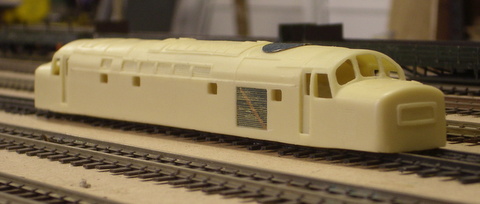
The eagle eyed amongst you might have noticed a couple of resin loco bodies standing on the fiddle yard. The one on the left is the master for a forthcoming class 66 body kit, and the one on the right and in close up above is a "L" of "L & J" class 40 resin body. Although I am now getting it to a stage where I am happy with it (just the diagonal bars on the side grilles to go), it has needed a lot of work to make it look the part - especially the windows, main grilles, and fan. I have used parts from a damaged 3mmSMR etched kit purchased from a fellow Society member last year.
Power will be provided from a pair of Tri-Ang A-1-A motor bogies which have had their side detail ground off on a bench belt grinder and the new sides glued on, plus a pony wheel added.
Hopefully the rain will pass off and I shall be able to get painting SOON!!
Sunday, 8 April 2012
I started doing the curved part of the outer fiddle yard just prior to going on holiday in the week before Easter and thought that readers might like to see the Heath Robinson method of getting the curves right!
The curves start six inches into the two adjoining boards and I nailed two strips of offcuts from laminate floor panelling to join at the centre of the circle and inserted a nail at the point where the lines crossed. To that nail was attached one end of a length of telephone wire long enough to reach the outer track. The other end was wound round a pencil. I did try string at first but this proved too stretchy. You could also try another baton of wood nailed in at one end and with pencil shaped holes at the right distances.
Starting with the outer track, the first track's centre line was traced and the wire wound in to the centre of the next track and traced. This continued until all tracks were traced onto the board. Crude but reasonably simple and accurate!
I have now started laying the tracks on boards L (shown) and A (to right). As there is a change in track used between the board on the left - Peco and Society to match the Peco Points, and board L GEM - as I have about 40 yard lengths to use up - it was not possible to lay across the join between boards K & L which would have been preferable so the alignment is done by eye.
Thursday, 29 March 2012
Some more fine weather has allowed me to press on with the outer fiddle yard entry throat, and the first picture shows the corner board where it enters the front viewing side. I have taken the opportunity to try the new Society lost wax brass cast sleepers which are to the same profile as the Ratio track base. They are designed to be soldered to brass screws set into the baseboard and here we see the left hand side in situ, and the right hand before fitting. The idea is to attack them with a slitting disc later.
The next couple of photos show general construction and fittings on baseboard joins with the brass dowels and up and over catches. I have noted that the sockets which engage with the hoops bend and thus it may well end up with a captive nut and bolt horizonally through both boards for final alignment, and a small wooden shelf on one side to support its neighbour.
These two photos show the underside of the boards showing the integral legs and cross bracing
Finally the completed throat for the outer fiddle yard.
Monday, 26 March 2012
With the temperature rising in the garage, I have been able to do some more tracklaying and have just completed board 4 (or C in the photo!). The last blog showed boards 1 & 2 in the process of being completed and 2 is nearest the camera.
This takes me as far as the difficult board (B) where the two fiddle yards will interlace so work will now jump to boards J, K, L and A which will be the mirror image of the first boards to be completed. Although the boards are lettered A to L, they are not being constructed in that order!
Just a note on the metal trestle - keep an eye out for special offers at lidl (http://www.lidl.co.uk/) - they come up about once a year at £9.99 or thereabouts and sell out within the first day or two.
Trains congregating to check the lengths are the British steel Iron Ore Tipplers (centre), Triang BDA's with steel load, and innermost BerlinerBahn (BB) container wagons with Tillig and BB containers.
This takes me as far as the difficult board (B) where the two fiddle yards will interlace so work will now jump to boards J, K, L and A which will be the mirror image of the first boards to be completed. Although the boards are lettered A to L, they are not being constructed in that order!
Just a note on the metal trestle - keep an eye out for special offers at lidl (http://www.lidl.co.uk/) - they come up about once a year at £9.99 or thereabouts and sell out within the first day or two.
Trains congregating to check the lengths are the British steel Iron Ore Tipplers (centre), Triang BDA's with steel load, and innermost BerlinerBahn (BB) container wagons with Tillig and BB containers.
Sunday, 18 March 2012
In response to questions raised by fellow members of the 3mm Society;-
The layout is 18' long by 10 feet deep. There are 12 baseboards sized between 4' x 2', 3' x 2' and two corner boards 3' square but angled off at 45 degrees at the outer corners mainly to avoid furniture in my garage. A future blog will include a track plan.
Track is pinned down on the hidden parts with no cork or polystyrene insulation - I like to hear the trains coming!! To do this without distorting, I first drill a small hole (0.4mm) just into the MDF then place a square or oblong file with the teeth facing down on top of the pin and parallel with the track and tap hard with a hammer. This avoids distortion and prevents damaging the track with the hammer.
My next blog will show progress on track laying this spring and focus on board joins.
The layout is 18' long by 10 feet deep. There are 12 baseboards sized between 4' x 2', 3' x 2' and two corner boards 3' square but angled off at 45 degrees at the outer corners mainly to avoid furniture in my garage. A future blog will include a track plan.
Track is pinned down on the hidden parts with no cork or polystyrene insulation - I like to hear the trains coming!! To do this without distorting, I first drill a small hole (0.4mm) just into the MDF then place a square or oblong file with the teeth facing down on top of the pin and parallel with the track and tap hard with a hammer. This avoids distortion and prevents damaging the track with the hammer.
My next blog will show progress on track laying this spring and focus on board joins.
Subscribe to:
Posts (Atom)